Tuesday, June 29, 2010

Miguel's White Sauce


I know that it's been almost a week since I've last posted.  I have a good excuse, I swear - I'm on Kauai, visiting my family and celebrating my sister's high school graduation.  I thought that I would have time to cook and share some of the recipes that I grew up on, but we have tons of food leftover from two consecutive graduation parties this weekend (my sister's was on Saturday, my cousin's was on Sunday) so there hasn't really been much of a reason to cook.  Plus, I'm exhausted from all the setting up, decorating, serving food, tearing down, and cleaning that hosting parties entails.  So while I rest for the remainder of the week, I'll leave you with this jalapeno white sauce.

Everyone I know in San Diego is crazy for the cheesy and creamy "white sauce" at Miguel's Cocina.  In fact, a lot of my friends will go to the restaurant, order a taco, fill up on the complimentary tortilla chips and white sauce, and take the taco home with them.

As it turns out, you can have your White Sauce fix even when Miguel's is too far away, as it is super easy to make at home.  I found out that if you ask a waiter for the white sauce recipe, they will give it to you on an index card...not that I actually asked for the recipe - I got it from someone who's much braver than I am!


White Sauce
Adapted from Miguel's Cocina

2 cups heavy cream
1 cup sour cream
1 tsp chicken base
2 tablespoons clarified butter
1 tablespoon flour
1 jalapeno, seeded and minced
1 tablespoon jalapeno juice
1 oz shredded cheddar cheese
1 oz shreeded monterey jack cheese

Heat cream over high heat.  When about to boil, add sour cream.  Mix well until sour cream is dissolved and reduce heat.  Stir in chicken base and jalapeno juice, and bring the sauce to a simmer.

While cream is heating, make a roux: warm the butter in a saucepan over medium heat, add the flour, and whisk until golden.  Just before the cream mixture is about to boil, add the roux, whisking constantly until incorporated.  Remove from heat.  Stir in jalapenos and cheese until thoroughly combined and smooth.

Thursday, June 24, 2010

Strawberry-and-Chocolate-Topped Cheesecake


 On Sunday, tragedy struck in the Cobbler Clobber kitchen.  

They were so innocent.  So helpless.  So tiny.  Yet, they were shown no mercy.

June 20, 2010 will forever be remembered as the day of the Teddy Graham Massacre.

Let us have a moment of silence to remember our fallen friends.


Now that we've had our moment of silence, let's talk about this cheesecake.

There was a chocolate crust, made with chocolate Teddy Grahams*. 


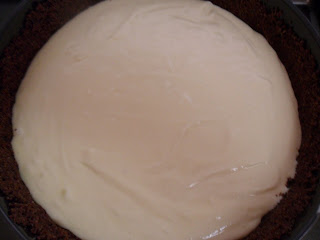
There was a smooth and creamy cheesecake filling, with four blocks of cream cheese and no sour cream to cut the richness. 


There was a shiny chocolate ganache glaze, which added more chocolatey goodness and (shhh!) filled and covered the cracks** in my cheesecake. 


Finally, there were strawberries, artfully arranged on top of the glaze.  I unfortunately have no evidence of the "artfully arranged" part, as I was in a rush to get the cheesecake to a party.

The result?  A ridiculously decadent cheesecake.  It was so rich that none of us could finish our relatively small slices, but believe me when I say that we really, really wanted to.


* I really, truly was going to follow the cheesecake recipe and went to the store for graham crackers.  However, I passed by the Teddy Grahams on my way to the graham crackers and, rather impulsively, grabbed a box, remembering that Smitten Kitchen swears by them. 

** I've heard several theories as to why cracks occur in cheesecakes. One is because of the sudden change of temperature when it goes from the oven to the open air. I tried to prevent this by turning off the oven about 15 minutes before it was set and keeping the cheesecake to cook in the slowly cooking oven. I then opened the oven door a crack to let some hot air escape. The other reason is because it is overbaked, which could very well be the reason why the cheesecake cracked. You would never be able to tell by eating it, though, because it was rich and creamy and not at all dry.
 

Strawberry-and-Chocolate-Topped Cheesecake
The recipe says it serves 12, but I cut it into 16ths.
Crust adapted from Gourmet, November 1999
Filling adapted from Bon Appetit, January 1998
Ganache glaze adapted from Smitten Kitchen

Chocolate Crust:
10 ounces ground chocolate Teddy Grahams
10 tablespoons unsalted butter, melted
2/3 cup sugar
1/4 cup salt

Stir all the ingredients together and press into the bottom and sides of buttered springform pan.  Fill right away or chill up to two hours.

Filling:
4 8-oz blocks of cream cheese, softened
1 3/4 cup sugar
2 1/2 teaspoon vanilla extract
pinch of salt
3 tbsp flour
5 large eggs

Beat cream cheese, sugar, lemon juice, vanilla, and salt until very smooth.  Beat in flour.  Add eggs and beat until just blended.  Pour batter into crust.

Bake cheesecake until outer 2-inch edge of cake is puffed and center is just set, about 55 minutes.  When cool, top with glaze.

Topping:

1/2 cup semisweet chocolate chips
2 ounces butter
1/4 cup heavy cream
1/2 tsp vanilla
1 tablespoon  powdered sugar

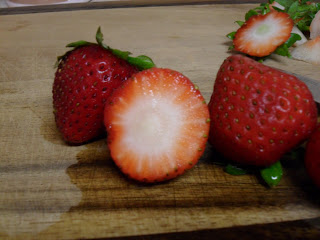
16 ounces of strawberries, halved

Heat cream and butter until scalding.  Remove pan from heat and stir in chocolate.  Whisk until the chocolate has melted.  Add vanilla and sugar; whisk until thoroughly combined.  Spread over cheesecake while ganache is still warm.  Arrange strawberry halves on top.  Chill until ready to serve.

Monday, June 21, 2010

Grapefruit Chiffon Cupcakes


Last weekend, David and I went to his sister's house for one of our nephew's birthday party.  When the party was over, several of us went grapefruit picking.  David's sister lives next to a grove of grapefruit trees that we assume doesn't belong to anyone because the ground is overgrown with thorny bushes and there are several overripe grapefruits decomposing under each tree.  At any rate, we picked to our collective hearts' content.  I picked one of each of the three varieties of grapefruit, but my father-in-law went a bit overboard and gave half of his loot to me, despite my protests that I'm the only one in the apartment who eats grapefruit and that the fruit will go bad when we leave to visit my family in a week.  He insisted that they would keep, and this is how I ended up with a plastic bag so full of grapefruit that it's bursting at the seams.


A freakishly large grapefruit


I could probably be happy eating them broiled every morning, but I decided that I wanted to experiment with the grapefruit.  Grapefruit is a fruit that doesn't show up very often in baked treats, probably because of its slightly bitter taste or because its zest isn't as pungent as that of lemons and oranges.  I briefly considered recreating the Hollywood grapefruit cake, but layer cakes can be time consuming and aren't as easy to share (and boy, did I want to share - I've eaten way too much cake this week).  After some consideration, I decided to do a variation of my family's favorite treat: chiffon cake.


Chiffon cakes are a lot lighter than their butter-based counterparts, but not quite as airy as angel food cake.  I was a bit worried that they wouldn't turn out well, as I usually have a lot of trouble beating egg whites to stiff peaks.  I've read so many tutorials that I should be able to do it with my eyes closed, but I guess that baking, as with most things, requires not only knowledge of theory, but lots and lots of practice.  I can usually get the egg whites to stiff peaks, but then they separate for some reason.  The top of the bowl would be foamy, but there would be liquid underneath.  I'm still not sure why this happens - perhaps I've been overbeating them?  At any rate, this is the first time I've beaten cream of tartar and sugar into the egg whites, and it really made a difference - the egg whites didn't separate this time!  Yay! 


I loved these cupcakes.  They're light and airy, and not too sweet.  The grapefruit flavor came through in the cupcakes, but it was really mild and subdued.  David really liked the cupcakes a lot, and he doesn't even like grapefruit!  We tried eating them with several different toppings.  My favorite way to eat them was after dipping the top into granulated sugar.  I really liked the crunch of biting into them and the little bit of extra sweetness it provided.  I also liked them sprinkled with a little bit of powdered sugar.  I tried piping some white chocolate cream cheese icing (leftover from the stuffed strawberries) onto the cupcakes, and while I thought that it slightly overpowered the cupcakes' flavor, my coworkers liked the frosted cupcakes best.


Grapefruit Chiffon Cupcakes
Makes about 40 cupcakes

2 1/2 cup cake flour
1 1/2 cup sugar + 3 tablespoons, divided
1 tablespoon baking powder
1/2 teaspoon salt
1/2 cup vegetable oil
8 eggs, room temperature
3/4 cup fresh grapefruit juice
2 tablespoons grapefruit zest
1/2 teaspoon cream of tartar

Preheat oven to 325 degrees.  Line muffin tins with cupcake liners.

Separate the eggs into whites and yolks.  Set the whites aside in a large, clean bowl. 

In another large bown, whisk egg yolks with 3/4 cup + 3 tablespoons sugar, until pale yellow and smooth.  Whisk in oil, juice, and zest until combined.  Sift in flour, baking powder, and salt; stir until throughly combined.  The batter should be thick, and fall in thick ribbons.

Using an electric mixer, beat the eggs until foamy.  Add the cream of tartar, and beat until soft peaks form.  Slowly add the remaining sugar, little at a time, until stiff glossy peaks form.

Stir in 1/4 of the egg white mixture to the grapefruit batter, to lighten it up.  Fold in the remaining egg whites gently until no streaks remain.  The batter should be light and foamy.

Divide batter between muffin tins, filling each one almost to the top.  Bake for 20-25 minutes.

Friday, June 18, 2010

Stuffed Strawberries Dipped in White Chocolate


Last weekend, David and I went to a great restaurant called Parkhouse Eatery.  We had gotten a gift certificate for Christmas, and as I had never heard of it before, I decided to visit the website to determine whether I needed reservations and if I needed to dress up to fit in.  I kind of snickered a little when I read the description, "casually elegant"- what does that even mean? (Rhetorical question) Surprisingly enough, the description actually fit the restaurant really well.  It was fancy and cozy at the same time, and the food was delicious.  I ordered steak wrapped in prosciutto with a pomegranate balsamic glaze and marscapone mashed potatoes.  David ate penne with smoked chicken, sundried tomatoes, and walnuts.  It was amazing.  We were going to share a white chocolate raspberry cheesecake for dessert, but unfortunately, they were out.


I felt kind of bad, as David really likes white chocolate and cheesecake.  I didn't have the time or energy to make a cheesecake, so I decided to recreate the flavors of the cheesecake by stuffing some strawberries with a white chocolate cream cheese mixture and dipping them in white chocolate.  They were extremely tasty, and I may or may not have eaten half of the strawberries all by myself in the time span of 30 minutes.

Word to the wise: make sure that both the cream cheese and the melted chocolate are at room temperature before you try to combine them.  Otherwise, the temperature change will "shock" the chocolate, and it will re-harden.  Instead of having a white chocolate flavored cream cheese mixture, you'll have a cream cheese mixture with shards of white chocolate in it...which isn't necessarily a bad thing, it's just, you know, not the same.


Stuffed Strawberries Dipped in White Chocolate

1 pound strawberries
4 -6 ounces white chocolate

Stuffing
4 ounces cream cheese, room temperature
2 tablespoons powdered sugar
1/2 cup white chocolate chips

Melt the 1/2 cup of white chocolate chips in the microwave at 30 second intervals, stirring well between each interval.  Let cool completely.

Cream together the cream cheese and the powdered sugar.  Stir in the white chocolate until completely combined.  Transfer the cream cheese mixture into a piping bag (a ziploc bag with a corner snipped off would also work).

Melt the white chocolate for dipping.  While it is cooling, wash and dry the strawberries.  Cut off the top of each strawberry and hull them:  trace the white circle in the center of each strawberry with a paring knife and hollow out the strawberry.  Squeeze some of the cream cheese mixture into each strawberry.  Dip each strawberry into the white chocolate and place on a plate or tray lined with wax paper.  Chill in the fridge until the chocolate hardens, about two minutes.

Thursday, June 17, 2010

Broiled Grapefruit


It's been a while since I've eaten grapefruit.  I was obsessed with it a couple summers ago.  I ate a grapefruit half every morning, the way my mom taught me: with salt sprinkled on top instead of sugar.  It muted the bitterness and brought out the grapefruit's inherent sweetness.  I must have gotten grapefruit fatigue, though, because after that summer ended, I didn't eat it again for two years. 

My grapefruit renunciation ended during my honeymoon last year.  David and I went to a restaurant that was supposed to be famous for its pancakes, but when I saw broiled grapefruit on the menu, my interest was piqued and I ordered it instead of the pancakes.

Fine, you got me.  I ordered it in addition to the pancakes.  I had coffee and orange juice, too.  You happy?


The first bite was like breaking into the top of a creme brulee.  Why had I been eating grapefruit with salt this whole time when I could have been eating with with a crackly topping of brown sugar and cinnamon?  My world was rocked.

I made a silent vow that I would eat broiled grapefruit every day from then on.  Sadly, I have not made it once in the past year.  Grapefruit isn't a fruit I really think to buy very often - I usually buy fruits that are easier to eat on-the-go, like apples, pears, plums, and peaches (because I always forget about breakfast until it's time to leave for work).  However, this week I have a large bag of grapefruit sitting on my counter, and they were practically crying out to me, "Broil us!  Broil us!".  And who am I to refuse?


 I originally planned to smear some butter on the top of the grapefruit before topping it with the sugar and cinnamon, as though it were bread and I was making cinnamon toast.  However, once I segmented the grapefruit, the juices starting flowing all over the place, and it would have been impossible to spread butter on it.  Instead, I cut a cold pat of butter into tiny pieces and mixed it in with brown sugar, cinnamon.  Then, just because the ground ginger was sitting next to the cinnamon, I added a smidgen of that, too.  I didn't want it to feel left out of the party.

When I told my co-worker about my breakfast this morning, he recoiled a little and asked, "You cooked it?  It was warm?"  I know I've been saying this a lot lately, but trust me: it might sound weird, but it's really, really delicious.  The heat in the oven caramelizes the grapefruit's natural sugars and brings its sweetness to the forefront.  The grapefruit's bitterness is still there, but it's barely noticeable when the brown sugar and the spices are swimming with the juices.  Best of all, the crackly layer of brown sugar on top...wait, I already mentioned the crackly topping?  Well, it was worth mentioning again.  Crackly topping.


Broiled Grapefruit

1 grapefruit, halved
1 tablespoon cold butter, cut into small pieces
4 tablespoons brown sugar
2 teaspoons cinnamon
smidgen of ground ginger

Move one of your oven racks to the top and turn on your broiler. 

Remove the white pith from the center of the grapefruit.  Segment the grapefruit (your future self will thank your past self for your thoughtfulness): trace your knife around the sections of fruit between the white membrane (if that's what it's called...I really need to catch up on my grapefruit anatomy). 

Combine the butter, brown sugar, cinnamon, and ground ginger.  Sprinkle the mixture onto each grapefruit half.  Broil the grapefruit for 4-5 minutes.

Tuesday, June 15, 2010

Nutella Cake Balls

AKA How to Impress Your Friends with Cake Scraps and the Bottom of the Nutella Jar


As I mentioned in a previous post, my oven sits on an incline, causing cake batter and cookie dough  to congregate near the oven door.  I try to compensate for this by rotating my cake pans about every 15 minutes or so, and the cake usually seems to even out.  However, I kind of dozed off while the third layer of my triple-layer double-chocolate cake was in the oven, and the cake came out very lopsided, which means...cake scraps!

When leveling layers of cake, I usually like to eat the pieces of cake that I scrape off.  However, there was no way I was going to finish off all the cake scraps I made this weekend - I probably had three cups worth of cake that I had set aside in a Tupperware container.  I decided that instead of eating the cake scraps (because really, why would you eat cake scraps when you could eat a 3-layer cake?), I would experiment with turning them into cake balls.

I was introduced to cake balls a few months ago by a friend and fellow baking aficionado.  It's apparently really popular in the South, and are often made by making a cake with a boxed cake mix, crumbling it up, mixing in a can of store bought frosting, rolling them into balls, and dipping them in chocolate.  I guess you could say that they're kind of like cake truffles. You can read a really fun article about cake balls here.

I decided to mix my cake scraps with some leftover buttercream frosting and the last of my Nutella.  I figured that Nutella was close enough in texture to canned frosting that it would work.  I ended up just drizzling some melted chocolate on top instead of completely coating the cake balls.  The resulting cake balls were softer than I would have liked, but were a big hit with our friends.  They really liked how the cake balls resembled chocolate truffles and melted in their mouths.  Not bad for something thrown together on the fly.


The following is more of a suggestion than an actual recipe.  I'm not going to tell you to make 3 cups of cake crumbs and 1/4 cup of buttercream frosting...but if you happen to have them around the house, you know what to do with them.

Nutella Cake Balls

2 1/2 - 3 cups chocolate cake crumbles
1/4 cup buttercream frosting
3 tablespoons Nutella
1/2 cup chocolate chips (use more if you want to completely coat the cake balls)

Mix together the buttercream frosting and the Nutella.  Combine the frosting mixture and the cake until the cake crumbs stick together and the frosting is well-incorporated.  Roll the cake mixture into tablespoon-sized balls.

Melt the chocolate chips in the microwave at 30-second intervals, stirring well between intervals.  Drizzle or pipe the chocolate onto the cake balls.

Monday, June 14, 2010

Triple Layer Double Chocolate Cake


My friend Tyler has the kind of fidelity that Jesse James could only dream of.  I could offer him desserts made with the sweetest, ripest fruits - pear plum crisps, strawberry lemonade bars, buttermilk raspberry cake - and Tyler would stay true to his one true love: chocolate.  So, naturally, when Tyler's birthday came around this year, there was only one thing I could make him: chocolate cake with chocolate icing.


I love making homemade birthday cakes for friends, but I admit that I had a bit of trouble with this one, not because it was particularly hard to make, but because of certain time constraints.  First of all, the icing needs time to cool before it reaches a thick and spreadable consistency.  I tried putting it in the freezer for 10 minutes, but David and I were late to meet our friends for dinner, so I frosted the cake while the icing was still thin and runny, figuring that messy frosting was better than no frosting at all.  Secondly, the cake is very tender and has a very loose crumb, which is great while you're eating it, but not so great when you're trying to assemble it.  I was kind of in a rush while putting it together, and a small part of the cake crumbled and avalanched down the side (which I'm sure you can tell by the top picture).


Even though the cake looked a bit messy and lopsided, it tasted so, so delicious.  I've tried several chocolate cake recipes, and this one is by far my favorite.  As I've already mentioned, it's amazingly moist and tender.  It also has a deep and intense chocolate flavor.  It was so decadent that none of us could finish our slices!  Even though it's time-consuming to make, it's a relatively simple and straight-forward recipe.

The recipe is for two 10-inch layers.  However, I only have 9-inch pans, so I divided the batter into three layers and baked it for slightly less time.  I decorated the cake with a simple buttercream icing.  There's no recipe, because again, I was in a rush, and I just mixed some powdered sugar into a little bit of softened butter until I deemed it thick enough and tinted it blue. 


Double Chocolate Layer Cake
Adapted from Gourmet, March 1999

Cake:
3 ounces semisweet chocolate, finely chopped
1 1/2 cup hot coffee
3 cups sugar
2 1/2 cups flour
1 1/2 cup cocoa powder
2 teaspoons baking soda
3/4 teaspoon baking powder
1 1/4 teaspoon salt
3 large eggs
3/4 cup vegetable oil
1 1/2 cup buttermilk (well-shaken)
3/4 teaspoon vanilla

Preheat oven to 300 degrees F.  Grease cake pans, line the bottom with wax paper, and grease the wax paper.

Combine chocolate with the coffee.  Let stand, stirring occasionally until smooth.

In a large bowl, sift sugar, flour, cocoa powder, baking soda, baking powder, and salt.  In another large bowl, beat eggs with an electric mixer until thickened slightly (about 5 minutes).  Slowly add oil, buttermilk, vanilla, and chocolate-coffee mixture, beating until combined well.  Add the dry ingredients, and beat until combined.

Divide batter between pans and bake for 50 minutes to 1 hour for 9-inch layers or 1 hour - 1 hour 10 minutes for 10-inch layers.

Cool completely before inverting (or else they will crumble).

Chocolate Ganache Icing:
1 pound semisweet or bittersweet chocolate, finely chopped (I've also used chocolate chips in the past)
1 cup heavy cream
2 tablespoons sugar
2 tablespoons light corn syrup
1/2 stick (1/4 cup) unsalted butter

Bring cream, sugar, and corn syrup to a boil over medium-low heat, whisking until sugar is dissolved.  Remove pan from heat and stir in chocolate.  Whisk until the chocolate has melted.  Cut butter into pieces, add to frosting, and whisk until smooth.  Transfer the icing to a bowl to cool, stirring occassionally.  To speed up the cooling process, you can put the bowl of icing in another bowl filled with ice and stir continuously.

To assemble the cake:

Level the cake layers with a long serrated knife or a cake leveler.  On the first layer of cake, spoon some chocolate ganache in the middle.  With a small spatula or butter knife, gently spread the icing outwards until you reach the edges, adding more icing as needed.  Place the second layer on top of the first one, and frost with chocolate ganache.  Place the final layer on top.  Pour some ganache on the top and spread outwards, letting it fall over the edges.  Frost the sides with the excess ganache from the top, working from top to bottom, adding more ganache as needed.  I also highly recommend slipping pieces of wax paper halfway underneath the cake to catch the frosting dribbles.  When you're done frosting the cake, you can slip them out for a presentation that's a lot less messy than mine.

Thursday, June 10, 2010

Red Grape Pizza with Rosemary, Honey, and Pecorino


Conversation earlier this week:

David: You bought grapes!  [pause] Are they for eating?
Alli: Yes, they're for eating...though I need a few of the red grapes for a project.
David:  I don't eat cooked grapes.
Alli: Hmmm.
David: Alli!  I don't eat cooked grapes, okay?!


Okay, I know what you're thinking.  You don't eat cooked grapes, either.  But trust me, grapes on pizza?  It may seem weird, but it totally works, especially when the sweetness of the grapes is combined with the salty bite of Pecorino Romano and the woodsy flavor of rosemary.  Plus, the recipe came from Jamie Oliver, who has an amazing accent and is therefore worthy of my trust.


You may or may not notice that my grape pizza looks a little...rustic.  This is because I didn't flour my cutting board and rolling pin as well as I thought I had.  Also, I assembled the pizza on the cutting board and then tried to move it to the baking sheet, which was very difficult to do and somehow made it square.  These were mistakes that I usually don't make, but I had just spent an hour in traffic, so I think I should get a pass.  For proof that I'm not completely inept and that I do, in fact, learn from my mistakes, take a look at the thoroughly respectable (and round!) barbecue chicken pizza I made for David.  Yes, I made personal pizzas so that David would not be forced to eat cooked grapes...cooked, roasted, crackly, juicy, gorgeous grapes. 

So...the inevitable changes to the recipe: I confess to using pre-made, store-bought dough.  I know that making pizza dough is supposedly easy and what not, and I will eventually conquer my fear of yeast and make pizza dough from scratch, but not on a weeknight, you know?  Also, the recipe said to grind the rosemary and olive oil with a mortar and pestle, but really, who has a mortar and pestle?  Not me, that's for sure.  Instead, I finely chopped the rosemary, put it in a bowl, drizzled it with a couple tablespoons of olive oil, and kind of mashed it together with the back of the tines of a fork...it worked just fine.


Red Grape Pizza with Rosemary, Honey, and Pecorino
Adapted from Jamie Oliver
Makes two personal pizzas

1 pound pizza dough (homemade or store-bought)
A few sprigs of fresh rosemary
3 tablespoons olive oil
2 teaspoons honey
A handful of red grapes 
1/3 cup grated Pecorino Romano cheese 
Optional: I also used a vegetable peeler to make the large shavings of cheese pictured above

Preheat the oven to 400 degrees.  Lightly grease a large baking sheet.

Remove the rosemary leaves from the sprigs and finely chop.  Place in a bowl, drizzle the olive oil over it, and mash with a fork.  Cut all the grapes in half and set aside.

Divide the pizza dough in half and, on a well-floured surface, roll each half into a circle.  Transfer the dough to the baking sheet.  Brush each pizza with the rosemary olive oil.  Scatter the grape halves on the pizzas, and drizzle each pizza with a teaspoon of honey.  Sprinkle with the cheese.

Bake the pizzas in the oven for 10-15 minutes, or until the dough is cooked through and the cheese has melted.

Wednesday, June 9, 2010

Giddy with Glee: Crisp Salted Chocolate Chip Oatmeal Cookies


I'm not sure whether I'm pessimistic or just realistic, but I generally tend to keep my expectations pretty low.  I find that it leads to less disappointment and leaves plenty of room for me to be pleasantly surprised.  For example, I was expecting the season finale of Glee last night to be a train wreck.  And while it was uneven and a little predictable (Liko called every plot twist, down to their dialogue), there were still some surprises, like having the glee club performing at Regionals (which was supposed to be the big event of the night) before the first commercial break.  Or, having the scenes of Quinn delivering her baby interspersed with the competing team's performance of "Bohemian Rhapsody", a sequence that was both bewildering and impressive.


However, I forgot all about keeping my expectations low when I saw the pictures of these cookies.  I daydreamed about eating these cookies all day at work yesterday before rushing home to make them.  After reading the description of the cookies (they may or may not have involved the words, "scandalously good") and all the comments from the people who made them and were awestruck by their glory, I was expecting nothing short of transcendence from these cookies. Unfortunately, these cookies fell a little short of those expectations.  The thing is, I know that my disappointment can mostly be chalked up to my expectations being unrealistic.  If I went into it having low expectations, I probably would have found them transcendent.
Furthermore, I thought these cookies would be entirely hollow, which was intriguing enough for me to move the cookies to the top of my must-do list, but my cookies spread during baking, flattening them out a bit (though they did have some "bubbles" here and there that lended the cookies the same "shatter-y" effect in the recipe description).


Of course, the disappointment could also be attributed to the fact that I do not follow directions.  Instead of using the white chocolate chunks so highly recommended, I used semi-sweet chips.  Instead of fleur de sel, I used course sea salt (because if you think I can afford fleur de sel, you are nuts).  While I'm at it, let me tell you that the size of these cookies are imperative to their outcome.  While I initially followed the directions to make the cookies using two tablespoons of dough, I later tried to make smaller cookies that were half the size, and they were definitely not the same.  Lesson of the day: follow directions.

So while these cookies aren't exactly the Second Coming, they aren't boring or ordinary either.  The truth is, once I got over my initial disappointment, I realized that these are still the best oatmeal cookies I have ever eaten.  They're the perfect combination of crisp and chewy, sweet and salty.  I brought about 30 of them in to work today and they were all gone by the time I got back from my lunch break, which is pretty impressive when you consider that I work in a pretty small office.  Now that I think about it, I suspect that our summer intern single-handedly ate half the plate.  Not that I'm complaining - these cookies are dangerous to have around the house. 


Crisp Salted Chocolate Chip Oatmeal Cookies
Adapted from Smitten Kitchen

1 cup flour
3/4 teaspoon baking powder
1/2 teaspoon baking soda
1/4 teaspoon table salt
14 tablespoons unsalted butter
1 cup sugar
1/4 cup brown sugar
1 large egg
1 teaspoon vanilla extract
2 1/2 cup rolled oats (do not substitute with instant oats)
6 oz semisweet chocolate chips
sea salt

Preheat oven to 350 degrees.  Line a cookie sheet with parchment paper or a silpat mat.

Whisk flour, baking powder, baking soda, and salt in a medium bowl.

In a large bowl, beat butter and sugar until light and fluffy.  Add egg and vanilla, and beat until combined.  Add flour mixture gradually and mix until incorporated.  Gradually add oats and chocolate; mix until well incorporated.

Roll dough into 2-tablespoon-balls.  Place 2 1/2 inches apart on the cookie sheet.  Gently press to 3/4 inches thick.  Sprinkle salt on each cookie.  Bake for 13-16 minutes, rotating halfway.  Cool on a wire rack until room temperature.

Monday, June 7, 2010

Taste Lab: Hazelnut Milk Panna Cotta


I have been looking for hazelnuts for some time now.  I've been experimenting with Nutella cookies lately, and the hazelnut flavor always gets lost during the baking process.  I am convinced that I need ground hazelnuts to make it work.  I have looked in every store I can think of, but no hazelnuts.

I did, however, stumble across hazelnut milk.  I picked some up, hoping to find the perfect chocolate hazelnut panna cotta recipe. 


Panna cotta is a cold italian dessert that is similar to a custard, but way easier to make - there's no tempering of egg yolks or baking in a water bath.  I usually find that it's a bit firmer than custard, but softer than Jello.  It's the perfect light dessert - no matter how full you are, you'll always have enough room in your stomach for a few bites of panna cotta.  However, just because it's light in texture, doesn't mean it's light in calories: panna cotta literally means "cooked cream" in Italian, and most recipes only involve three ingredients: heavy cream, sugar, and gelatin.  I don't make panna cotta very often because it's dangerous for my waistline, but I couldn't pass up the prospect of a good cooking experiment.  After doing a lot of research, I channeled my inner Bill Nye and got to work.

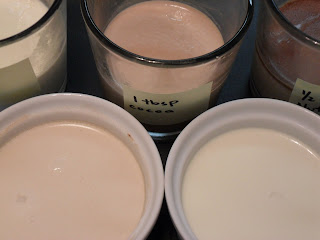
Because hazelnut milk is pretty thin, I decided to cook it with some heavy cream to thicken it. I also cut down on the sugar because the hazelnut milk was already lightly sweetened.  When I was done cooking the panna cotta mixture, I divided it into five glasses/ramekins.  I left one plain, for comparison purposes.  I added cocoa powder (which is a great way to add chocolate flavor without any additional sweetness) to two of them: one tablespoon to one and one teaspoon to another.  Because I worried that the hazelnut notes wouldn't come through if I only added cocoa powder, I added half a tablespoon of Nutella to the fourth one.  I added two drops of almond extract to the last one, for an extra nutty panna cotta.


Texturally, the panna cotta came out just the way I wanted it.  It was on the softer side of panna cotta, probably more similar to custard than anything else.  However, I don't think it would hold together if you tried to unmold it onto a plate.  This was fine with me, as I prefer to eat my panna cotta out of a cup, a little bit as a time, and put it back in the fridge to finish later. 

I am happy to report that all of the flavor variations turned out great.  However, I noticed that when the panna cottas had set, the ones with cocoa powder had a darker layer on the bottom, while the one with Nutella had a dark skin on the top.  I suspect that this won't be a problem if you cook the cocoa/Nutella with the panna cotta mixture instead of stirring it in afterwords, but it was delicious even with the different layers.


In my mind, the panna cotta with the smaller amount of cocoa powder was the winner.  The chocolate and hazelnut flavors were perfectly balanced and a bit subdued, which is what I was hoping for.  In the recipe below, I will refer to this is chocolate hazelnut panna cotta.

The panna cotta with Nutella was also very good - the Nutella flavor was very pronounced, and you'll probably prefer this one if you're a big fan of Nutella.  However, because of the additional sugar in Nutella, this panna cotta was very sweet, so you should cut down on the sugar even more if you're planning on adding Nutella.  In the recipe below, I will refer to this as Nutella panna cotta.

The panna cotta with 1 tablespoon of cocoa powder was delicious, with a deep chocolate flavor.  However, the hazelnut flavor didn't come through at all.  I think this amount of cocoa powder would be the perfect amount if you want to make chocolate panna cotta, which you could make with any other kind of milk.  However, if you are using regular milk, you might want to add a little more sugar to the mixture, as regular milk is unsweetened.  I will refer to this variation as chocolate panna cotta in the recipe below.

The panna cotta with almond extract was nice and nutty, but again, the hazelnut milk got overwhelmed by the almond extract.  You could probably add almond extract to a panna cotta made with any other milk and get the same effect. 

The plain hazelnut panna cotta was very delicious.  The hazelnut flavor was there, but it was very subtle.  I think that it would be great served with a tart berry compote or coulis, to offset the sweetness of the panna cotta.


Hazelnut Milk Panna Cotta

1 1/2 cup hazelnut milk (I used the Pacific Foods Beverage brand)
1 1/2 cup heavy cream
1/3 cup sugar
1 envelope gelatin*
2 tablespoons water

Variations:
Chocolate Hazelnut Panna Cotta: add 1 1/2 tablespoons cocoa powder
Nutella Panna Cotta: add 2 1/2 tablespoons Nutella and reduce sugar to 1/4 cup
Chocolate Panna Cotta: add 5 tablespoons cocoa powder

Directions:
In a shallow bowl, bloom the gelatin: sprinkle the gelatin over the 2 tablespoons of water.

In a saucepan, combine the milk, cream, sugar, and cocoa powder/Nutella (if using).  Stir over medium-high heat and bring to a boil.  Remove from heat.

Heat the gelatin in the microwave for 8 seconds and scrape all the gelatin into the cream mixture, quickly stirring it all together.  Let the panna cotta mixture cool for a little bit before dividing them into glasses or ramekins.  Chill the panna cottas in the refrigerator for at least three hours or until firm. (I let it set overnight.)

* If you want a firmer panna cotta that you can unmold, use a ratio of 2 cups liquid to 1 packet gelatin.  I would suggest 1 cup hazelnut milk and 1 cup heavy cream.  Reduce the sugar according to your personal tastes.

Friday, June 4, 2010

Grilled Bread with Zucchini, Goat Cheese, and Basil


Last week, I got the following e-mail:

"Alli! You haven't seen Julie and Julia yet?!!!! You have to!!! You would love the film and it reminds me so much of you and your cooking escapades :-) Please be sure to see it asap!"

The very next day I read an article about infuriating art in which a movie reviewer said that he had never been more agitated during a movie than during the Julie half of "Julie and Julia".

It was strange to read two strong and very disparate reactions to the movie, as "Julie and Julia" seemed like a fairly innocuous film.  At any rate, I decided that it was time to finally sit down, pull the movie up on Netflix Instant Watch, and watch the movie.


I was surprised to find that I actually really enjoyed the movie.  Sure, the movie has it's faults (which I'm not going to go into here), but it was entertaining and fun. 

At the beginning of the movie, there's a scene where Julie is preparing dinner.  Ironically, in a film about delicious French food, what appealed to me the most was the shot of slices of bread frying in a pan.  My very first thought was, Fried bread!  (What?  Were you expecting something more cogent?  It's fried bread!)  My second thought was, Is that allowed?


My friends, I am happy to tell you that it is, indeed, allowed.  The other day, I stumbled upon a recipe for Grilled Bread with Zucchini, Ricotta, and Basil in the Real Simple recipe archives. As I have a refrigerator full of zucchini and am constantly looking for new ways to prepare it, I took the discovery of the recipe as a sign that I should needed to make it as soon as humanly possible. 

I made a lot of changes to the recipe.  I don't have a grill, so I toasted the bread in a large skillet and roasted the zucchini in the oven.  Instead of plopping the ricotta onto the bread along with the zucchini, I spread a thick layer of goat cheese on the toast before topping it with the zucchini.  Also, since I didn't want to eat big raw basil leaves (the flavor can be very strong), I chopped the basil and cooked it with the zucchini.  All in all, it was a very satisfying and tasty dinner.


Grilled Bread with Zucchini, Goat Cheese, and Basil
Adapted from Real Simple

6 thick slices of french bread
4 oz goat cheese
1 large zucchini
3 tablespoons chopped basil (about 7-8 large leaves)
3 tablespoons olive oil
1/2 teaspoon salt
1/4 teaspoon pepper

Preheat oven to 350 degrees.

Cut the zucchini in half and cut lengthwise into thin slices.  Toss with olive oil, salt, pepper, and basil.  Spread out slices in a single layer on a large cookie sheet and roast in the oven for 15 minutes.

Brush both sides of each slice of bread with olive oil and toast until golden brown in a large skillet over medium heat.  Transfer to a plate. Spread a thick layer of goat cheese on each slice and top with a pile of zucchini.

Note: I enjoyed the toasts with the thin zucchini messily piled high.  David liked it better with thicker slices of zucchini laid flat on the toasts.  Both ways are delicous.